CD Studio: JavaScript (PSAM3210)
What is Vue?
Vue is a JavaScript framework for building user interfaces. It builds on top of standard HTML, CSS, and JavaScript and provides a declarative and component-based programming model that helps you efficiently develop user interfaces, be they simple or complex.
Vue is a single page application framework, much like React, Svelte, or Angular. SPAs work by loading all the application code and logic into the browser when you load the page. Then, based on your interaction, it will conditionally render or change the contents presented on the page. Entire websites are built using these frameworks, most famously Facebook.
Installing Vue and Vite
Prior to class, install Node. If you’ve been using running your assignment tests locally, you’ve already done this.
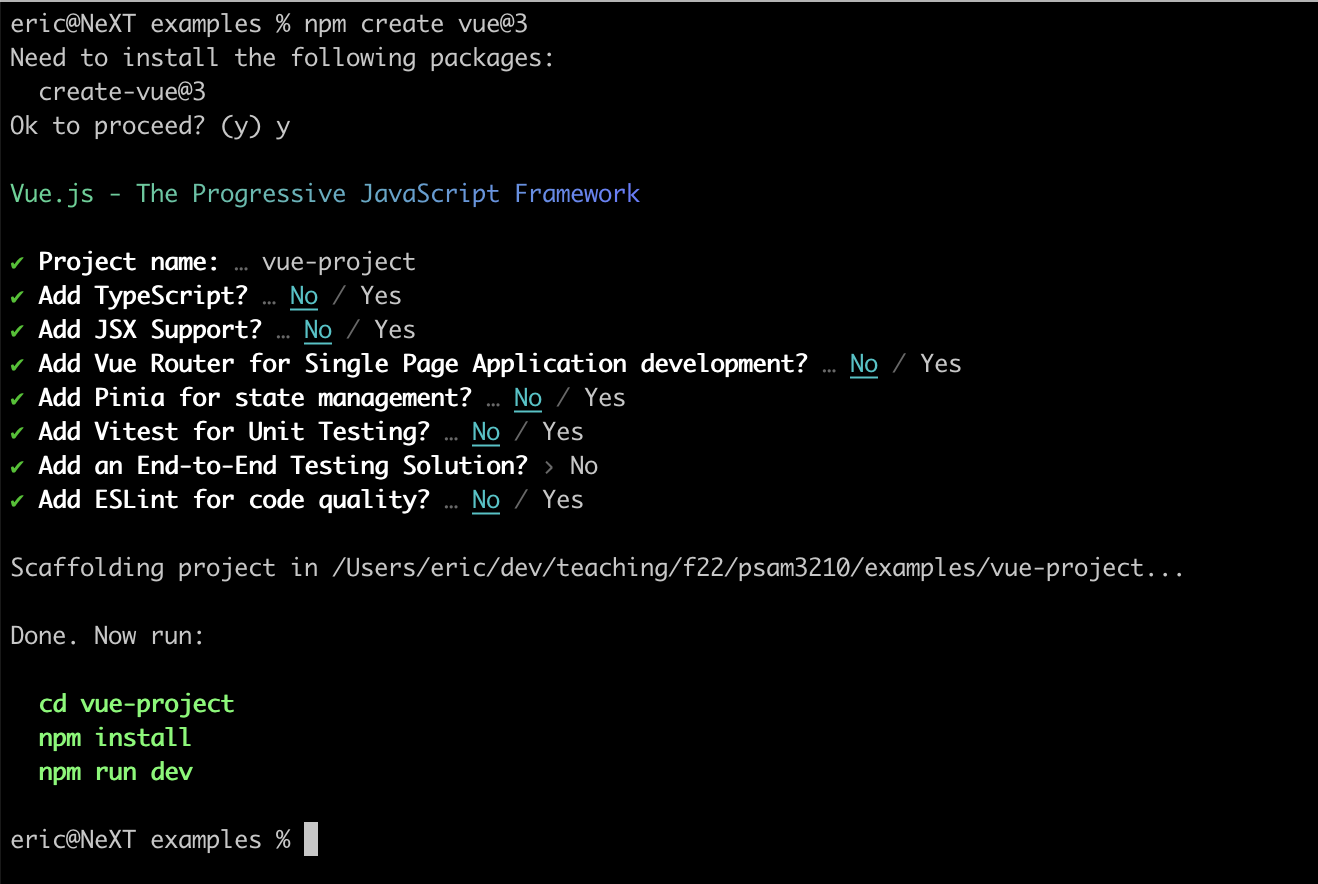
Now, create a Vue app in your code directory, and follow the prompts. For now, select no for everything except for the first prompt.
npm create vue@3
After you run through the prompts, follow the commands you were given:
cd vue-project
npm install
npm run dev
This will first change your directory to the directory with your Vue application in it. At this point, you’ve actually installed both Vue, as well as Vite. Vite is both a local development server, as well as a module bundler for deployment.
In essence, we’ll use Vite as the platform on which we build Vue webapps.
Deploy to GitHub pages
We’ll also have to configure our code to run in GitHub Pages. Create a new file at .github/workflows/node.js.yml and add the following code:
# This workflow will do a clean installation of node dependencies, cache/restore them, build the source code and run tests across different versions of node
# For more information see: https://docs.github.com/en/actions/automating-builds-and-tests/building-and-testing-nodejs

name: Node.js CI

on:
  push:
    branches: [ "main" ]
  pull_request:
    branches: [ "main" ]

jobs:
  build:

    runs-on: ubuntu-latest

    strategy:
      matrix:
        node-version: [16.x]
        # See supported Node.js release schedule at https://nodejs.org/en/about/releases/

    steps:
    - uses: actions/checkout@v3
    - name: Use Node.js $
      uses: actions/setup-node@v3
      with:
        node-version: $
        cache: 'npm'
    - run: npm ci
    - run: npm run build --if-present
    - name: Deploy
      uses: peaceiris/actions-gh-pages@v3
      with:
        github_token: $
        publish_dir: ./dist
In addition, edit your vite.config.js file to include a line which sets the base URL of your site on GitHub pages (it should be your repository name if you are not using custom domain names). For example, my vite.config.js for a repositroy name vite-template looks like this:
import { fileURLToPath, URL } from 'node:url'

import { defineConfig } from 'vite'
import vue from '@vitejs/plugin-vue'

// https://vitejs.dev/config/
export default defineConfig({
  plugins: [vue()],
  base: 'vite-template',
  resolve: {
    alias: {
      '@': fileURLToPath(new URL('./src', import.meta.url))
    }
  }
})
This will let GitHub pages build your app and host it at the right location.
Thank you to this guide and the official Vite documentation for material to put this section together.
Or… just clone this template
Lucky for you, you can also just copy this template repository which already has some of this behavior built in to your own repository.
- Once you’ve created a repository off of the template, enable GitHub pages. If you forgot how to do so, reference our topic on Git.
- Pull your code to your computer, run
npm installto install Vite and Vue into your system. - Edit
vite.config.jsas mentioned previously to mirror your repository name. - Run
npm run devto get a local version of your code running.
After this, any commits and pushes to GitHub will automatically deploy your website correctly.
Chrome extension
I also strongly recommend downloading this Chrome extension to help with debugging.
Anatomy of a Vue project
Our project contains the following:
.github/            # GitHub Actions workflow
.vscode/            # VSCode settings
dist/               # Built Vite files
public/             # Non-compiled static assets not used in Vue (like favicon)
src/                # Source files
.gitignore          # Git ignored stuff
README.md           # README
index.html          # index.html that pulls in built JS and static assets
package-lock.json   # Locks packages to specific versions
package.json        # Package manager and metadata file
vite.config.js      # Vite configuration file
We’ll take a closer look at the src/ folder. It contains the following files:
assets/             # CSS and other assets for Vue components
components/         # Vue components
App.vue             # Main App component (pulls together other components)
main.js             # Orchestrates (sets up) the Vue app
There’s a lot going on here! So it’s really important to keep our file names coherent and organization clean.
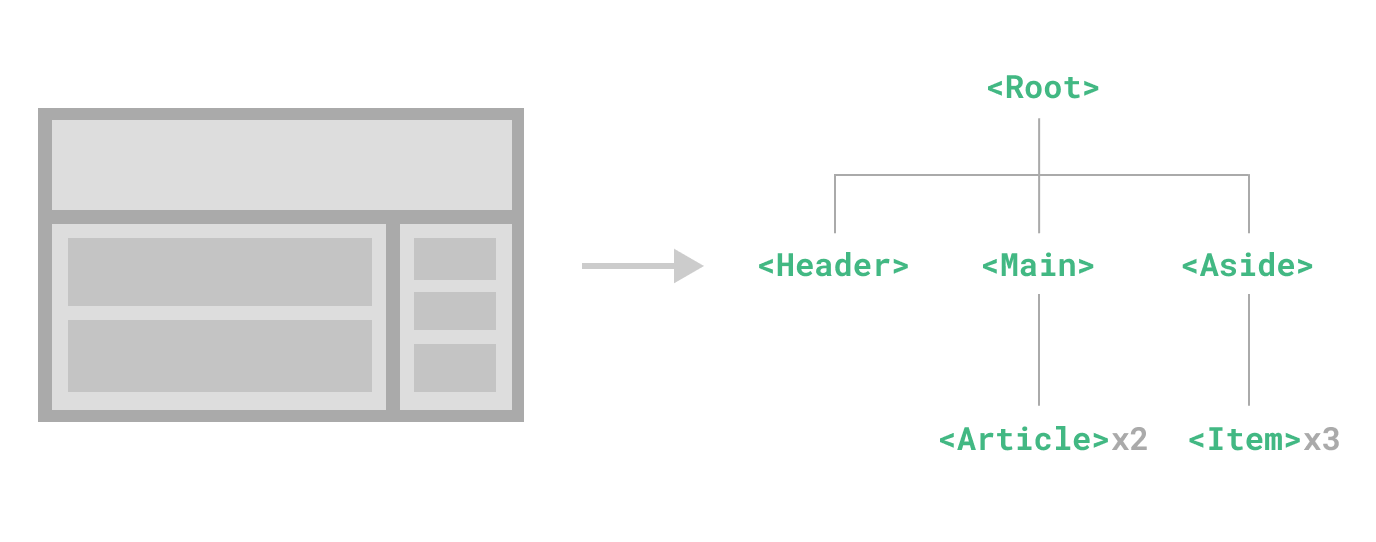
Components
The bread and butter of any Vue or SPA based web app is components. A component allows us to divide our interface elements into independent and reusable parts. Just like we want to modularize our JavaScripts, HTML, and CSS, SPAs let us modularize our interfaces. An app is created by organizing a collection of nested components.
A Vue component is self contained. It will contain the HTML template required to show it, the JavaScript required to make it interactive, and the CSS required to render it correctly. This makes components very portable!
Vue makes use of the existing custom component syntax that exists within HTML, but implements its own behavior. The goal is to represent an interface in a clean and self-contained way. For example, we could show a todo list as such:
<list>
  <list-item text="Item 1" checked="false" />
  <list-item text="Item 2" checked="false" />
  <list-item text="Item 3" checked="true" />
</list>
.vue files
Vue components most commonly live in component-name.vue files, commonly called Single File Components (SFCs). These files are ingested by Vue and Vite and rendered into constituent HTML/CSS/JS formats. Here’s a very basic example of a greeting.vue:
<template>
  <p class="greeting" v-html="greeting"></p>
</template>

<script>
   export default {
     data() {
       return {
         greeting: 'Hello World!'
       }
     }
   }
</script>

<style scoped>
   .greeting {
     color: red;
     font-weight: bold;
   }
</style>
As you can see, each technology is represented in its own element: <template> contains our HTML, <script> exports an object based representation of our component, and <style> contains component scoped CSS.
<template>
This part of the SFC contains the actual HTML being rendered into the web browser. It contains a mix of Vue based rendering logic, as well as regular HTML. More can be found here.
<p></p>
This is the most basic example of Vue — it interpolates a JavaScript variable msg into the rendered HTML.
<p v-bind:id="myId"></p>
You can also connect attributes to Vue, using the v-bind: directive. This directs Vue to make the id of this element reactive and it will change if myId changes.
<p v-if="active">Only if active</p>
The v-if directive will only render the enclosed HTML if active is true.
<button @click="active = true">Click me</button>
Another directive that you may use is the @click directive. This maps on to a click event, and then evaluates the JavaScript in the quotes.
<div>
   <component-a v-bind:color="color"></component-a>
</div>
Finally, another very common syntax we’ll see is nesting components within other components. Here, we are rendering another component <component-a> with a property (prop for short) color, which will update dynamically with the value of the JavaScript variable color (since we are using v-bind:).
Lots to get through!
<script>
Vue components can be written using two methods: Composition or Options. For our purposes, we’ll stick with Options, as that is what Vue was classically designed on.
  import OtherComponent from './OtherComponent.vue';

  export default {
    name: 'Greeting'
    props: {
      name: String,
    },
    components: {
      OtherComponent
    }
    data() {
      return {
        greeting: 'Hello',
      },
    },
    computed: {
      welcomeMessage(): {
        return `${greeting} ${name}!`;
      }
    },
    methods: {
      clicked(): {
        this.greeting = 'Goodbye';
      }
    }
  }
Each Vue SFC exports a JavaScript object by default. This SFC contains several keys:
nameis the name of the component.propsis an object which holds any passed down props from a parent component. Think of these as the constructor params which are immutable.componentswill contain any sub-components that this component uses.data()is a function, which returns mutable object properties.computedare any properties (written as functions) which are derived from props, data, or other computed properties.methodsfunctions that are called by events or other parts of the component which provide additional behavior.
There are other properties that can be part of this object, but these are the basics. You can read more about this at Vue’s very well written documentation site.
Component lifecycle
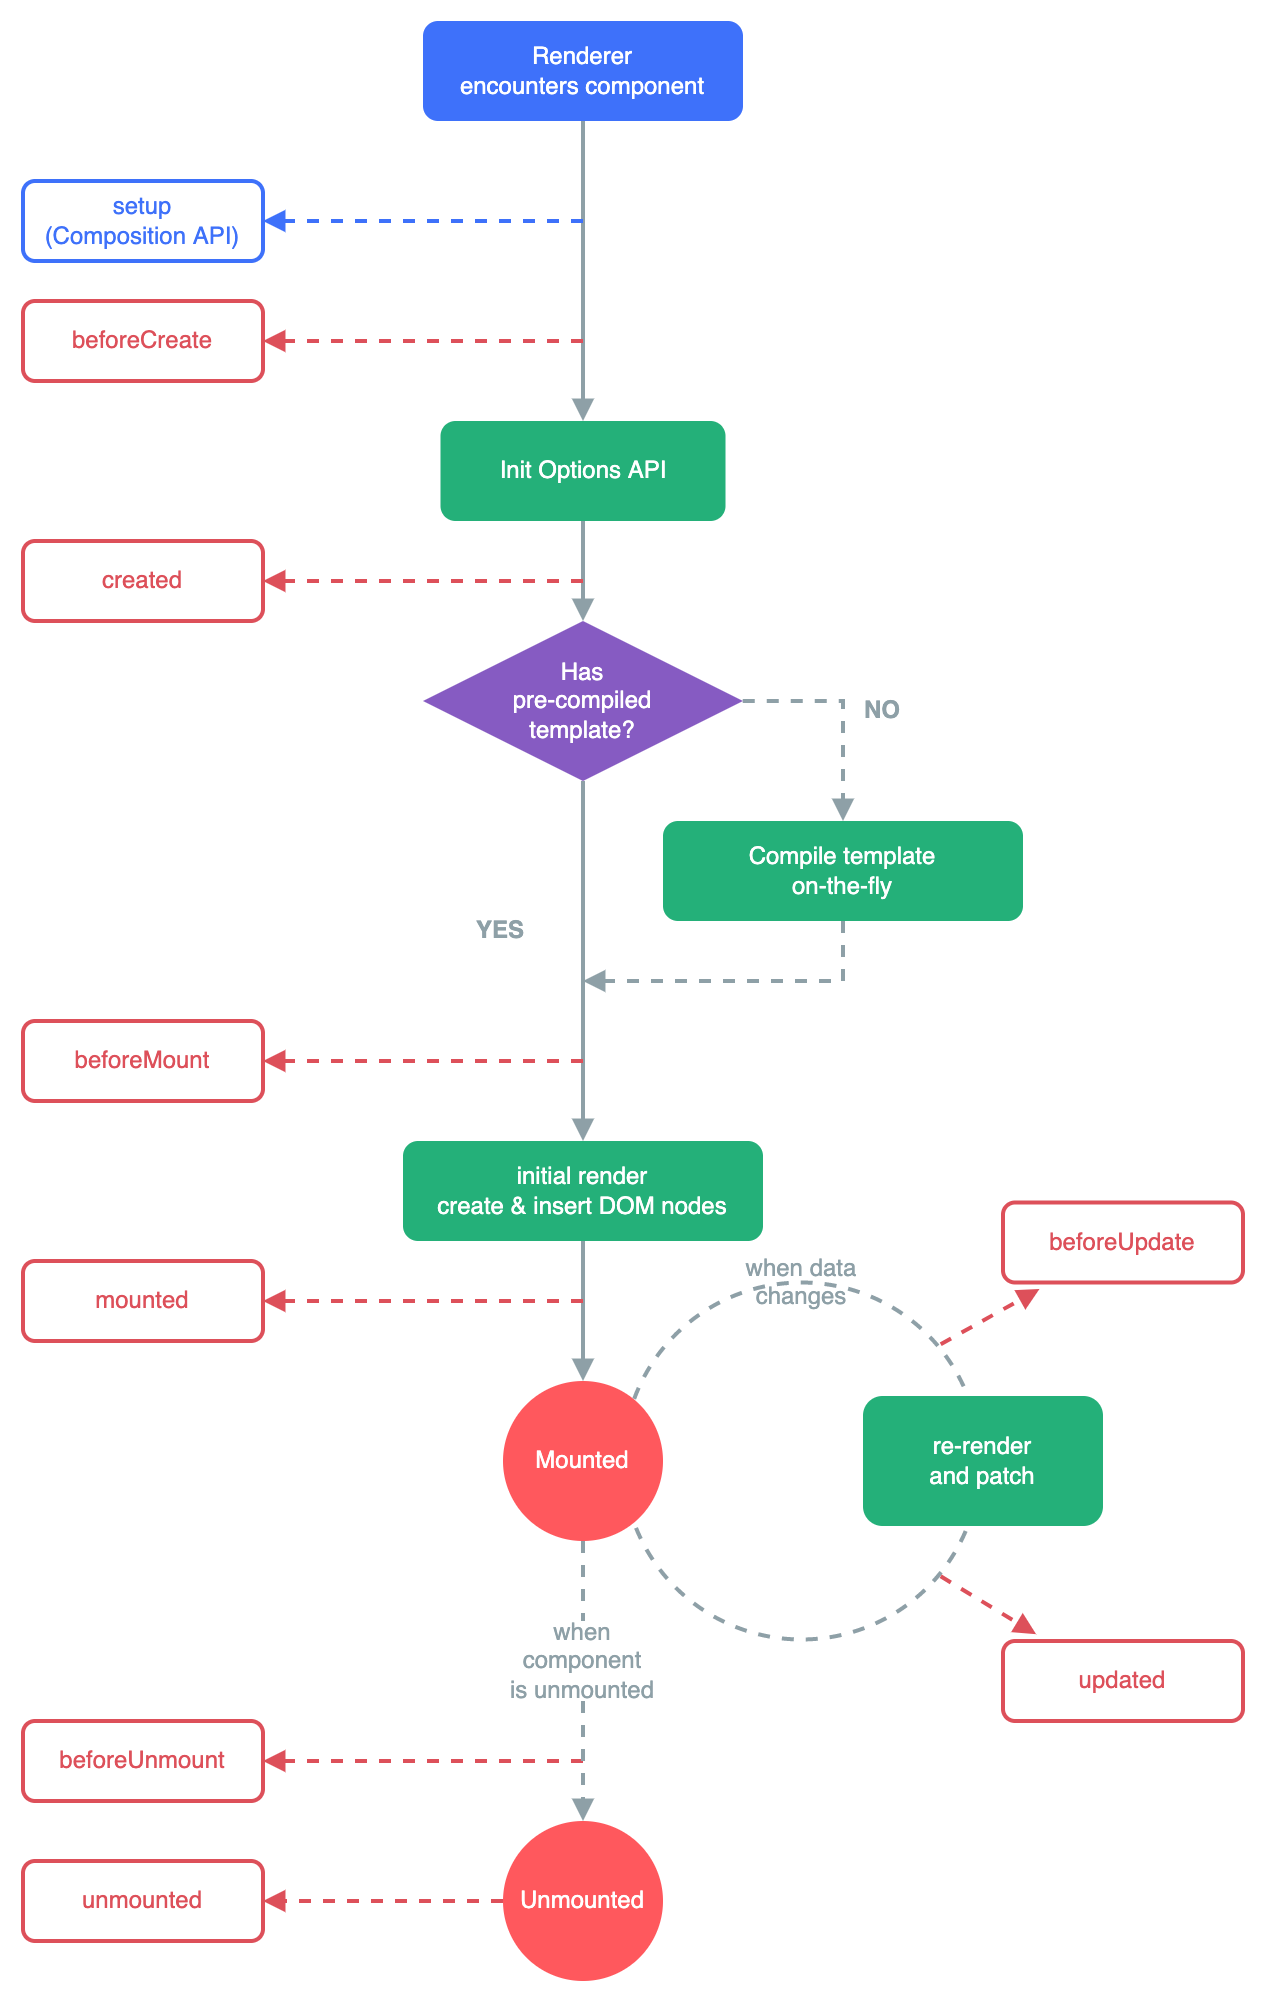
This diagaram illustrates how a component is actually brought into existence and is eventually destroyed. The functions on the left are lifecycle events that you can have your components hook into!
For example, if we wanted our component to do something right when it was added to the DOM, we could have this:
 export default {
  mounted() {
    console.log('do something!');
  }
 }